
Craft - Stick Launchers
Supplies
4 Craft Sticks (also known as Popsicle Sticks)
2 Buttons
1 Rubber Bands (make sure it has a bit of width to it)
Crafting Paint
Plastic straw
Glue Gun
Scissors
Cotton Swab
Instructions
Step 1 – Paint two of the craft sticks one color, and two another color. You will be gluing them together so that is why we painted ours to have two matching, but really they don’t need to match. Just paint them however you want!
Step 2 – Using a glue gun, glue two popsicle sticks together. Then glue the other two together. We are doing this for two reasons. First, it makes the structure stronger. Second, the end of the handle becomes an anchor point for the rubber band while loading the Launcher.
Step 3 – Choose which is going to be the handle and which is going to be the crossbar. Place the crossbar about 1/4 of the way from the top of the handle and glue in place.
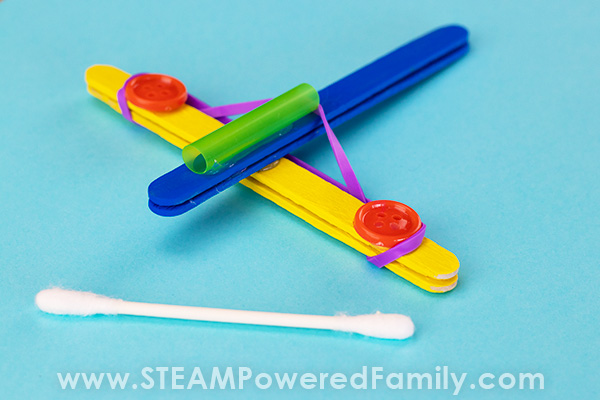
Step 4 – Make sure your crossbar is on the bottom (so you have the smooth surface of the handle on top). Now glue your buttons on the crossbar about 2 cm in from the ends.
Step 5 – Cut your straw about 6 – 8 cm in length should work.
Step 6 – Glue the piece of straw on top of the handle so it is above the crossbar near the front. Let the glue set for a few minutes.
Step 7 – Wrap the rubber band around the end of the crossbar on one side, then repeat on the other side. Pull the long side of the rubber band and anchor it on the end of the handle. Your Launcher is now ready for action!
Using your craft stick launcher
To use the launcher, place a Q-Tip cotton swab in the end of the straw. Carefully lift the rubber band off the end of the handle and pinch the Q-Tip and elastic between your index finger and thumb. Pull back until the Q-Tip end is just inside the straw. Make sure your other fingers are out of the way, and then LET GO!
You can also check out the video link below to watch the craft stick launcher being made